Homemade Candy Cane Ice Cream


I think I was in high school when I first discovered the wonderful seasonal deliciousness that is candy cane ice cream. To be honest, I had never even thought to taste candy cane ice cream because I am not a big fan of candy canes. They are one of those seasonal foods that I feel like everybody eats simply because they are cute and it’s tradition (like candy corns or cheap valentine’s day chocolates). I think the only reason I thought to try it was because someone brought some over. I thought I would be eating it politely, but instead my world was changed. Somehow, putting candy canes into a mixture of cream and sugar and slow-churning makes them all the more powerful. I was hooked.
Homemade Candy Cane Ice Cream

Equipment needed/suggested:
Wooden Spoon
Whisk
Medium Saucepan
Mixing Bowls
Tips and Tricks
Kyle and I asked for an ice cream maker our first married Christmas. What can I say, we love ice cream, and I was willing to make room for it even in our studio apartment. I hadn’t done any research prior to asking for one, but thankfully my aunt who purchased it for me did. When I unwrapped our gift, I fully expected our ice cream maker to be the typical fill with ice, add copious amounts of rock salt, make a giant mess that’s worth it because ice cream kind.
I would have been happy with any ice cream maker, but apparently ice cream makers are much more awesome now. The one we got as a gift 5 years ago and still use today is this one. Instead of freezing the ice cream with ice and salt, you freeze the entire ice cream container prior to using it. There is some kind of magical liquid inside the container that freezes, keeping the container ice cold for long enough to churn the ice cream when you remove it from the freezer. For convenience, our ice cream freezing bowl stays in the freezer all the time. This way, we are ready to make ice cream whenever the whim arrives, we don’t have to wait 12-24 hours for the container to freeze. Man, I love modern technology, and my own ingenuity.
I will be honest, this homemade candy cane recipe is slightly finicky. Only slightly, and let me explain why. I used to make my ice cream base the easy way. Throw together some cream, sugar, vanilla, maybe some other add-ins or flavorings, and churn away. Of course eating cream and sugar is always delicious, but the ice cream was far from perfect. The main problem that I had is that the mouthfeel of the ice cream was super fatty and unappetizing. It also seemed to leave a waxy coat over my whole mouth. Yuck. I did a little research and discovered that I was likely over-churning my ice cream to butter (learn more here). Um….double yuck!!

You can solve the over-churning problem by carefully watching your ice cream in the ice cream maker, and stopping churning when it’s just thick and the consistency of soft-serve. However, I have found that my favorite way to get awesome ice cream at home is to make a custard base which consists of adding egg yolks and cooking the mixture before churning it. This is helpful with the mouthfeel problem. I am not sure why, but it seems to bring all the parts of the ice cream together more cohesively and fixes the mouthfeel problem. Also, the addition of more fat from the egg yolks makes the ice cream a bit richer.
Making a custard base really isn’t too difficult. It does add a little bit of time to the ice cream making process because you will want to wait for your base to be very cold before you churn it. It does take a little while to cool down. The other mildly tricky part is making your custard without accidentally cooking your egg yolks. I will try to concisely describe how to temper your eggs before adding them to the hot liquid to help avoid this problem.
Tempering Egg Yolks for candy cane ice cream custard base
This recipe begins by gently heating a mixture of heavy cream and 2% or higher milk over medium heat in a saucepan, stirring constantly. Meanwhile, separate your egg yolks into a medium mixing bowl. Whisk with 1/2 C sugar until a thick paste forms.
When the milk mixture is very hot and steaming, add 1 Tbsp at a time to the egg mixture, whisking vigorously and immediately after adding. If you have any kitchen helpers that you trust either with hot liquids or to whisk vigorously. This is much easier done with two people. Continue adding milk 1 Tbsp at a time until you have added 1/2 C (8 tbsp). At this point, your egg mixture should be lukewarm. Next, add this mixture back to the rest of the mixture. I pour the mixture through a fine mesh strainer as I do this to remove any tiny bits of egg yolk that might have been cooked in the tempering process. Be sure to whisk vigorously the entire time you are adding the egg and sugar mixture, until it’s all incorporated.
Finishing the candy cane ice cream custard base
After the eggs have been incorporated, return the mixture to the heat and cook over medium heat. Stir often with a wooden spoon. The custard is done when it coats the back of a wooden spoon. It doesn’t get SUPER thick (partly because this recipe uses few egg yolks than many), so don’t be holding out for it to turn into pudding. The consistency to me looks like melted ice cream (which is essentially what it is…). Be careful not to cook the custard too long, because you may still cook your eggs again if you over cook it. Overcooking can also cause the mixture to separate. Don’t let me scare you though. It really isn’t hard.
That’s it!
I hope this post has been helpful and hasn’t totally scared you out of making your own candy cane ice cream. It comes together pretty quickly. It will totally impress your family/guests as welcome alternative to all the holiday baked goods this season. To make it a more complete dessert try it with brownies. That’s my very favorite way to eat it! I’ve yet to add my own brownie recipe to the blog, but I’ve been eyeing this recipe from my good friend at Longbourn Farm.
What’s your favorite ice cream flavor? Does candy cane ice cream have a place on your list? I’ve got some great ideas floating around my head for more flavors to try. Salted Pistachio and honey…I’m coming for you.
Thanks for reading! I love feelin’ the love so feel free to comment, share, or email me to let me know what you think!
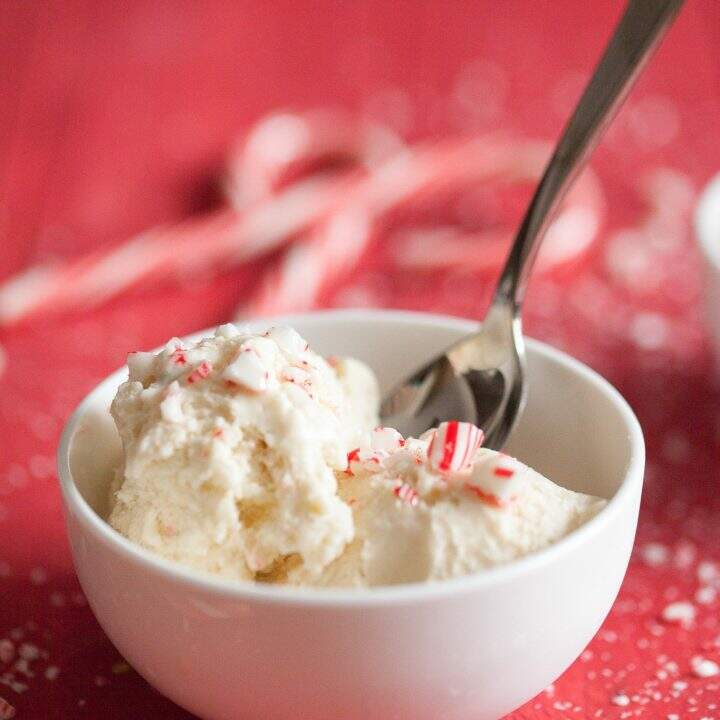
Homemade Candy Cane Ice Cream
This candy cane ice cream is the perfect holiday treat. Ice cream is a welcome change from the traditional baked goods of the season. Serve with brownies and chocolate sauce for the perfect dessert.
Ingredients
- 1 C Heavy Whipping Cream
- 2 C 2% Mlk
- 4 Egg Yolks
- 1/2 C Sugar
- 1/2 tsp Peppermint Extract
- 1/4 tsp Vanilla Extract
- 6 Peppermint Candy Canes, crushed, plus more for garnish
- 1 pinch salt
Instructions
- Heat milk and cream in a saucepan over medium heat until it begins to steam.
- Meanwhile, in a medium bowl whisk together egg yolks and sugar to form a thick paste
- When the milk mixture is hot turn off the heat
- Remove 1/2 C of hot milk mixture from the pan. Add hot milk 1 Tbsp at a time to egg mixture, whisking vigorously during each addition until all of the hot milk has been incorporated.
- Pour egg mixture through a fine mesh strainer back into the saucepan of hot milk to strain out any pieces of egg that might have gotten cooked.
- Return the pot to medium heat and heat until the mixture thickens slightly. It won't thicken a lot. It is thick enough when it coats the back of a wooden spoon and resembles the texture of melted ice cream. Be careful not to overcook as it may get lumpy or cook the eggs.
- Add peppermint extract, vanilla, and pinch of salt to ice cream base. Refrigerate until very cold, at least 4 hours or overnight
- Remove custard base from refrigerator and stir in candy cane pieces
- Churn in ice cream maker until it just resembles the consistency of soft serve ice cream. I churned the ice cream for about 10 minutes. Be careful not to over churn the ice cream.
- Eat immediately or put in a tupperware container in the freezer until ready to eat.
Notes
You may want to add additional crushed candy canes on top of the ice cream when serving as the crushed candy canes get incorporated into the ice cream and are difficult to see.
Nutrition Information:
Yield: 6Amount Per Serving: Calories: 366