
#51 Homemade Caramel Apples
Homemade caramel apples can be both a fun tradition, and beautiful works of art. Take the stress out of caramel apple making and make gourmet homemade caramel apples will this foolproof recipe!
Click here for FREE download of caramel apple gift tags!

One of my favorite fall traditions is dipping and decorating homemade caramel apples. We have done it almost every Halloween season since we were married 7 years ago. The tradition is fun, and the apples always taste amazing. The problem, however, is that most of the time my caramel apples come out looking like a hot. mess.
I wish I had taken pictures, but you know what i’m talking about, caramel dripping everywhere, toppings falling off, looks worse than my two year old’s art projects. Yeah. This year I decided enough was enough and I really delved into the research of perfect caramel apple making. I even tested 3 different caramel
recipes so you don’t have to (your waistline can thank me later, and if you’re looking for a thank you gift, a gym membership would be real nice. ahem.)
After putting what I learned in the books (or on the trusty internet) to the test I am here to share my top tips for making beautiful, tasty, gourmet, amazing homemade caramel apples. Every. Single. Time.
Hold the applause.

This post contains affiliate links, meaning that if you make a purchase from one of these links a small percentage comes back to me at no additional cost to you. Learn more by visiting my disclosure page.
Steps to perfect homemade caramel apples
- Pick the right type of apple- My favorite kind of apple for homemade caramel apples is granny smith. I just think the green apple looks right with the caramel, and the tart flavor is perfect for the sweet caramel and toppings. Some other options are jonagold, or honeycrisp. But you definitely want a tart, fairly firm apple variety in this case.
- Size Matters- Most people think homemade caramel apples and they pick the most gigantic apple they can find. While this might make a pretty apple, I recommend looking for medium apples. The apples will look much bigger when they are covered with caramel, chocolate, and toppings…and it means the caramel to apple ratio will be on point!
- Get those apples nice and clean-Storebought apples usually have a weird waxy coating to help them last longer. We usually dip apples that we get when we go apple picking so they are fresh off the tree, but if you use apples from a store you will want to scrub that film off. I usually fill the sink with warm water, add the apples, and scrub each apple well with a clean scotch pad. Then dry the apples completely before dipping, or the caramel wont’ stick.

- Check your cream-Is it just me that gets annoyed with all the different kinds of heavy cream? Like what the heck is the difference, whipping cream, heavy whipping cream, whaa?? For this recipe you need to be sure that your whipping cream is nice and fatty (not too watered down with milk like they like to do). You need it to have at least 36% butterfat. Don’t stress, it will say on the bottle somewhere the fat percentage, you might just have to look around a bit.
- Use a candy thermometer-People are pretty scared of candy-making, and with good reason, you’ve gotta be on your toes and there are lots of opportunities for something to go wrong. There are ways to check doneness of candy without a thermometer, but trust me here and just save yourself the hassle and get one. They’re cheap, and it makes the process easy!
- Let it be-My biggest tip for making candy that doesn’t crystallize is to leave it alone. You really don’t need to stir it, promise. Give it a good stir right at first to make sure the sugar, water, and corn syrup are evenly distributed and then just let it cook. One more tip is to have a bowl of water and a pastry brush sitting next to the pot. Then if crystals start to form on the sides of the pot, simply wet the pastry brush with water and push the crystals back down into the caramel to dissolve. I’ve made this recipe lots, and haven’t had it crystallize yet with this technique!
- Be ready and waiting- This caramel recipe has two major steps. First is bringing the temperature of the sugar up to 320 degrees, then it’s returning the mixture to 245 degrees after you’ve added the cream and butter. You need to be ready with the cream and butter to add it as soon as your thermometer reads 320 degrees as the caramel can cook very quickly once it gets to high temperatures. I prepare the cream and melt the butter so it can be whisked in immediately when the timer on my thermometer goes off. You will also want to quickly remove the caramel from the heat when it reaches 245 degrees and move it to another container so it doesn’t continue cooking in the pan after you remove it from the heat.
- Dip dry, cool apples-I usually try to wash my apples a day in advance so the apples have a day in the refrigerator to get nice and cool. This way when you dip them in the caramel the cold apple can start setting the caramel. I also dry the apples with a paper towel before dipping to remove any pesky condensation that might have come from the refrigerator.
- Cool caramel (slightly) before dipping-Many caramel apple recipes suggest dipping as soon as the caramel comes off the heat, but i’ve never really had success with this method. I usually let it cool about ten minutes (I’m not sure what temperature the caramel is at this point…) and I have much more success with the caramel actually sticking to the apple in stead of
- Easy Does it-if the caramel gets too cool, heat it up very slowly over very low heat until it reaches a dip-able temperature again. When I say slow, I mean slow. Heat it up too quickly and your caramel might separate (the fat separates from the sugars making an oily mess that isn’t appetizing AND doesn’t stick to apples). I have heard some people have success with keeping their caramel in a slow cooker on warm to avoid it getting too cool, but I have yet to dry this so I can’t attest to the results.
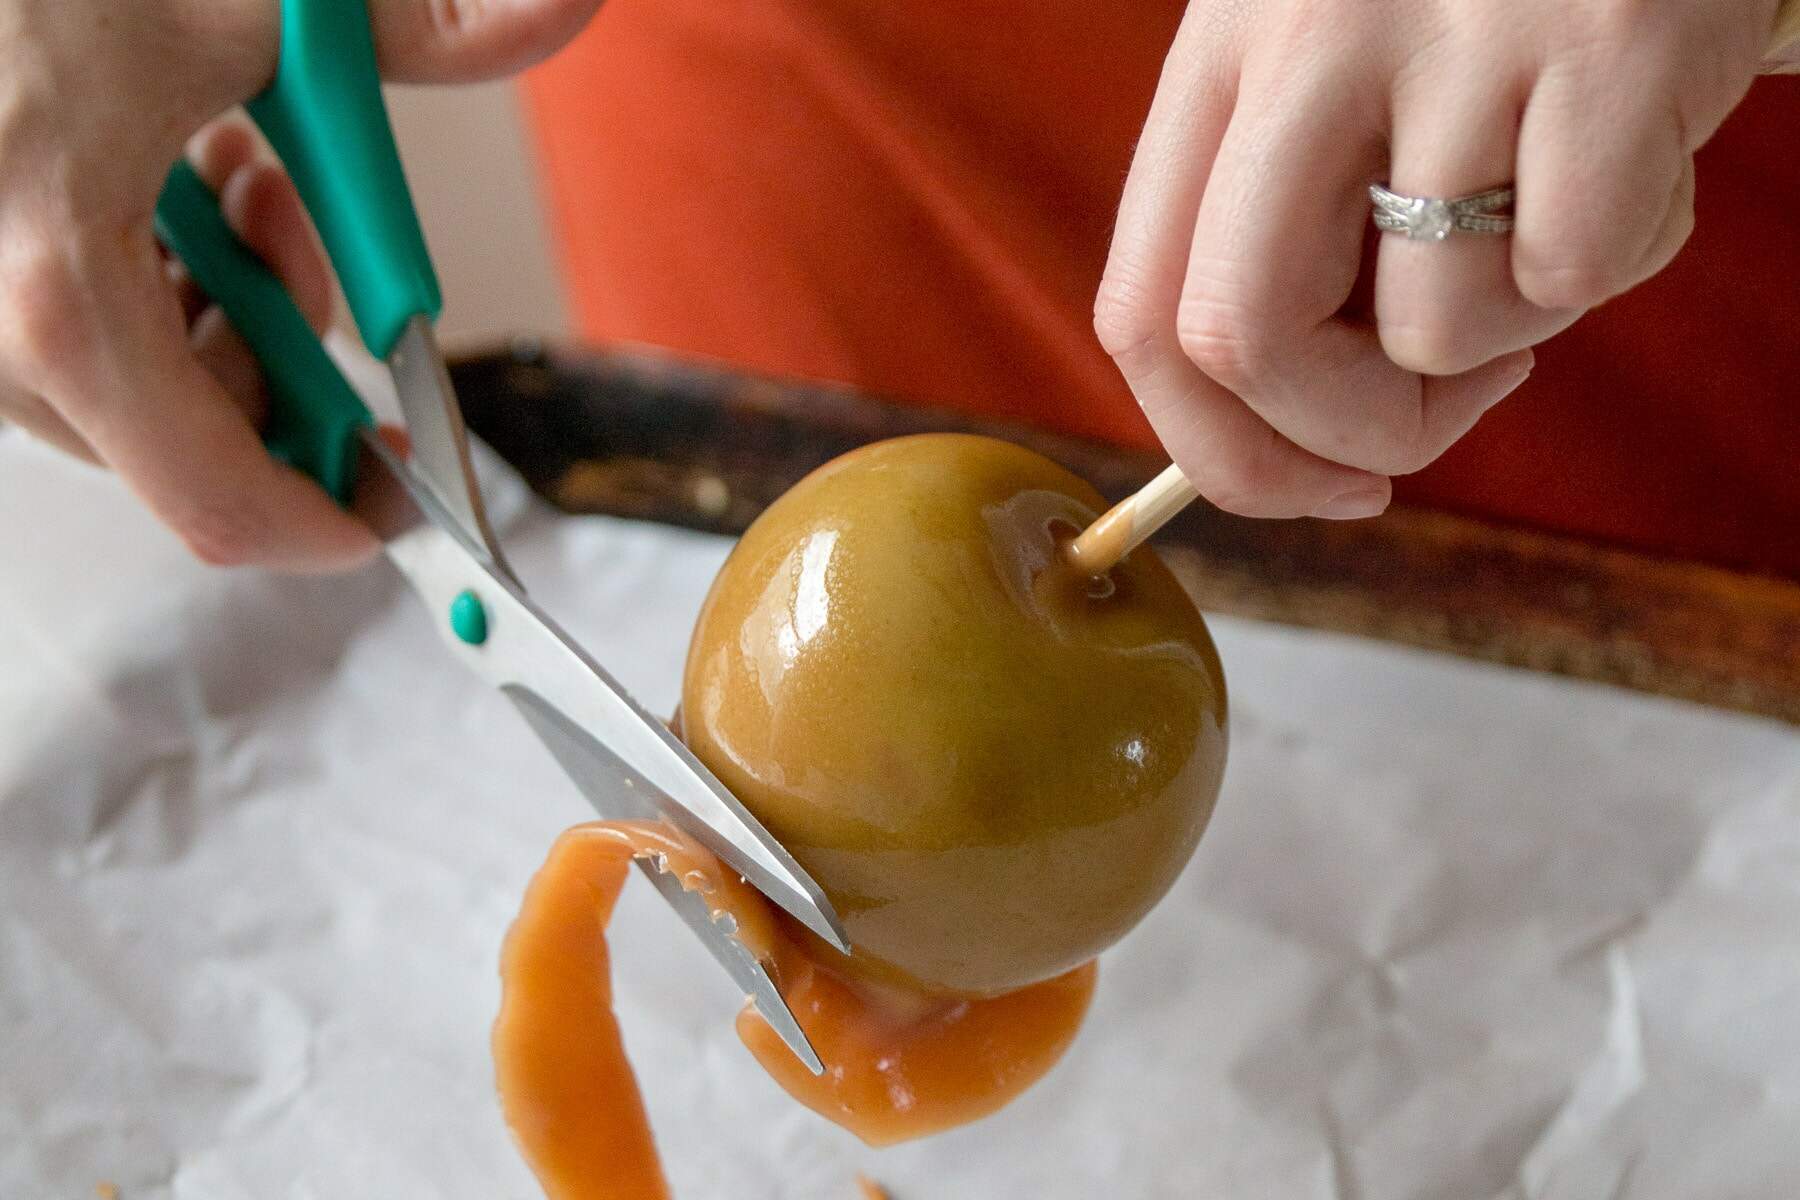
- Don’t sweat the drips– I have always wondered how to make homemade caramel apples that don’t have a pool of caramel at the bottom. I used to try holding my apples for minutes and minutes to get the caramel REALLY set before I set it down, but inevitably I would still end up with an ugly caramel “foot” on my caramel apples. I learned a trick that has revolutionized my caramel apple making, simply cut off the foot when the caramel has set! This makes it look so much better, and if it’s still not perfect don’t stress because…

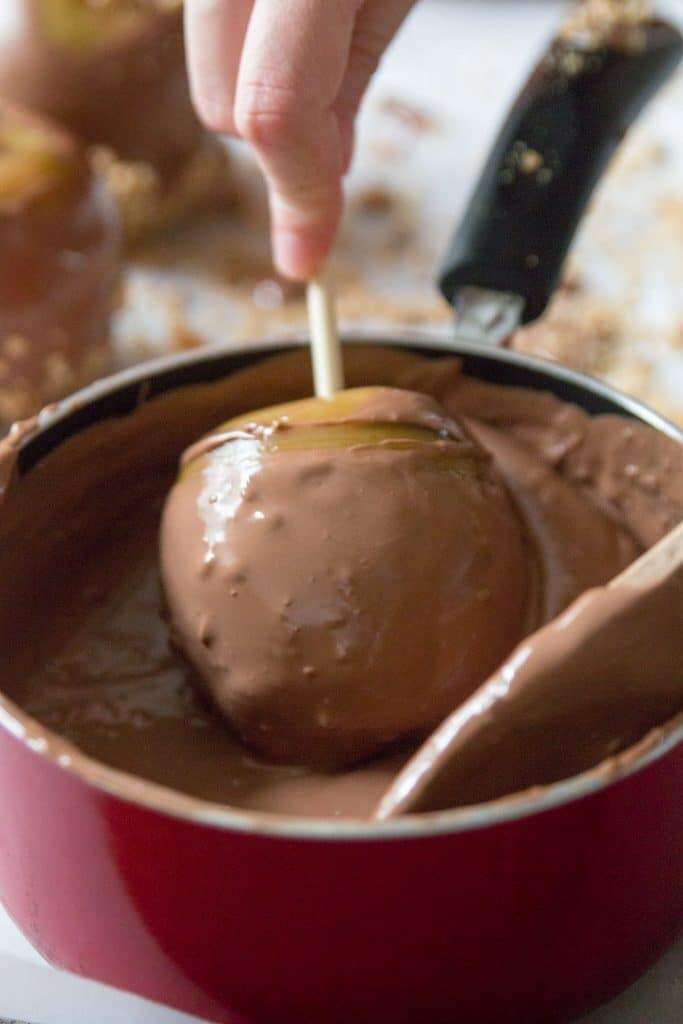
- Chocolate is your best friend-another tip for hiding flaws in homemade caramel apples is to dip it in chocolate after dipping it in caramel. It makes for such a pretty presentation, and it tastes amazing. If you want to have an apple dipping party I would recommend doing all the caramel apple dipping yourself, then your friends can do the chocolate dipping. It’s the fun part, and less temperamental than dipping in caramel. I do suggest using high quality melting chocolate. I buy mine from my grocery store’s bakery that sells a lot of dipped chocolate. You could also try a local chocolate shop to see if they sell their dipping chocolate.
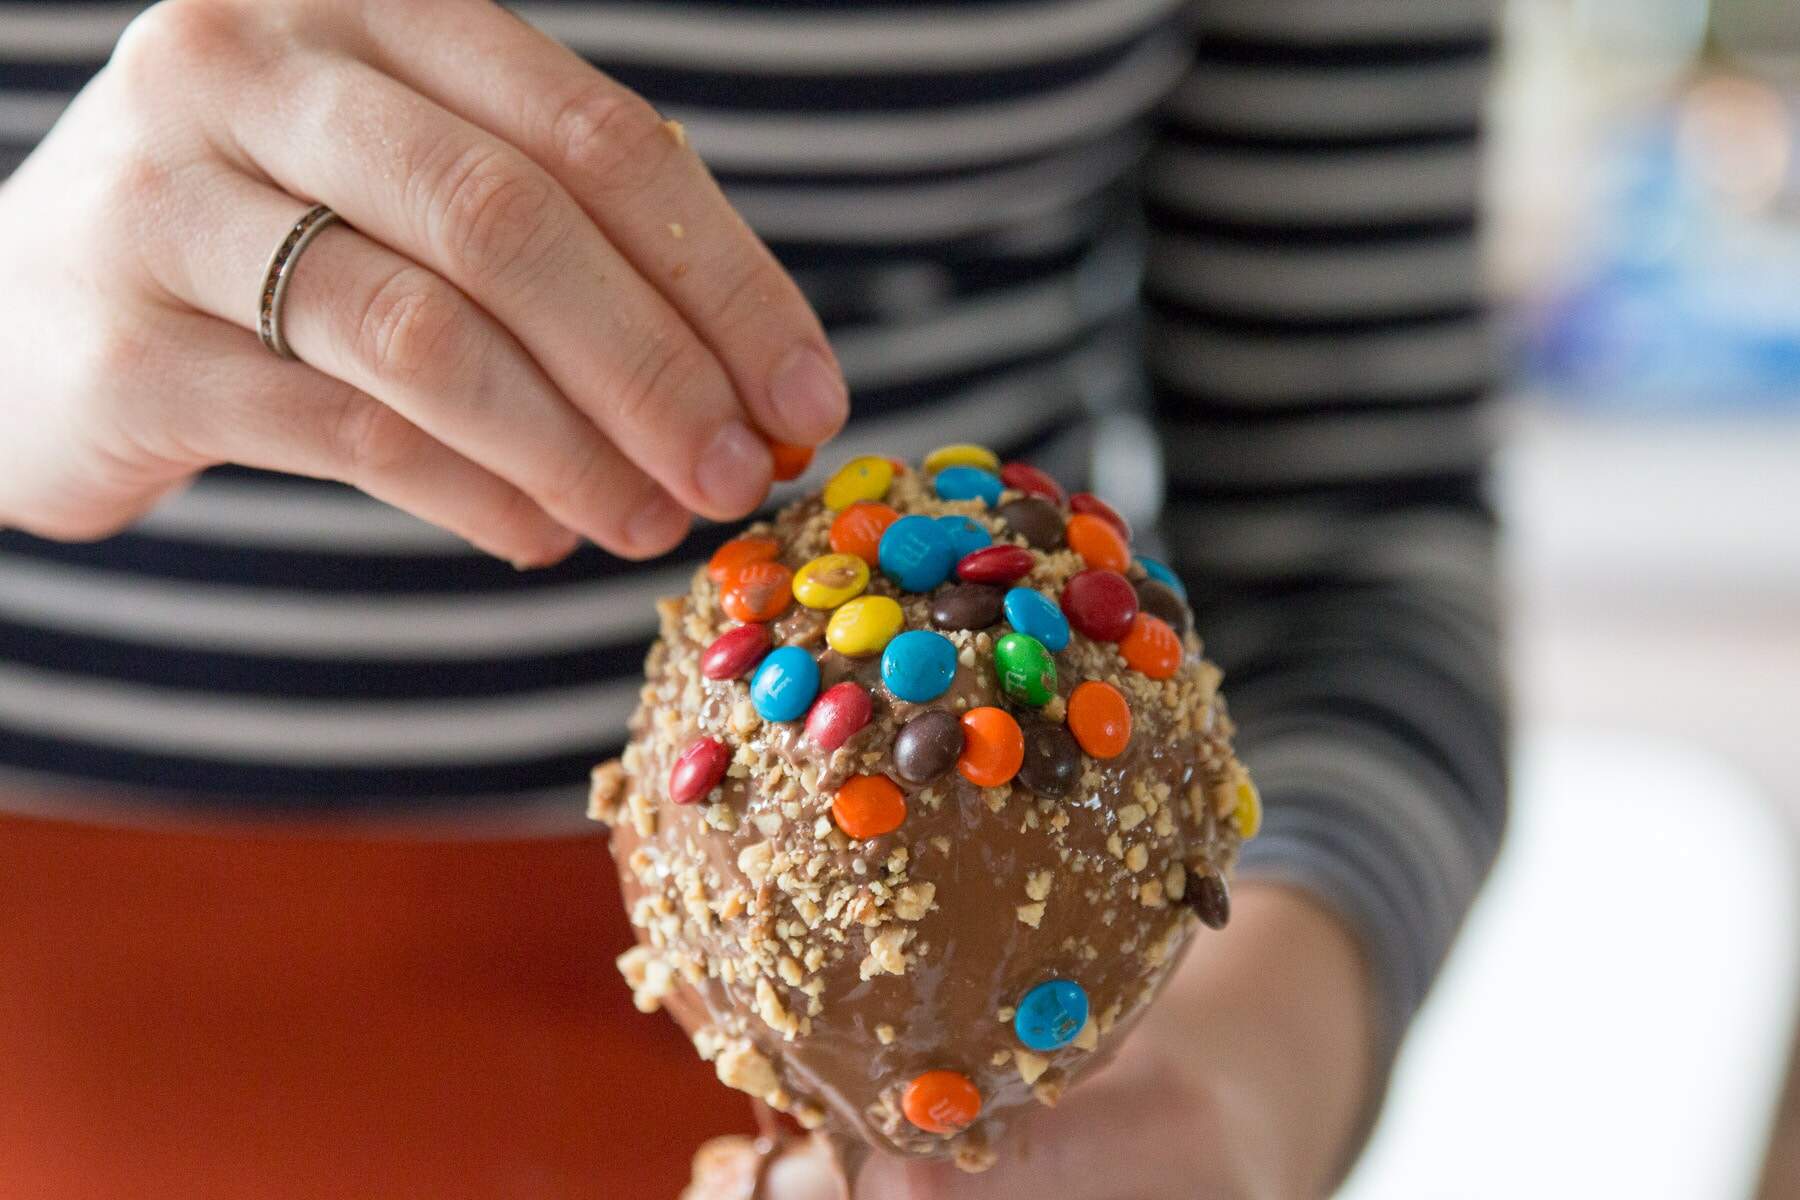
- Add the finishing touches- One thing I learned about decorating homemade caramel apples, is that it’s much easier to sprinkle toppings on top of the chocolate covered apple than it is to dip the apple into toppings. When you dip, lots of caramel falls of and makes a *delicious* mess. If you sprinkle the presentation is nicer, and you don’t ruin your bowls of toppings with excess chocolate.
- BONUS TIP: Cut your homemade caramel apples before eating!!- I have heard a lot of people complain about not liking caramel apples because they are messy to eat, they stick in your teeth, or because by the time you get to the middle of the apple the caramel is all gone. The BEST way to eat a caramel apple is to cut it in pieces before you eat it. Then you get the perfect bites with chocolate, caramel, apple, and toppings all in one delicious bite!


So what should you do with these 12 gorgeous homemade caramel apples once you are done with them?? Well you should eat at least one, but for us 12 caramel apples in the refrigerator is pretty dangerous. Make some cute gift tags and share with your friends!
Homemade Caramel Apples
Caramel Apples can be easy and fun with the right recipe and the right tips. Your apples will taste amazing, and look like they came from a gourmet candy shop!
Ingredients
- 12 tart apples (ie granny smith, honeycrisp, jonagold)
- 12 popsicle sticks
For the homemade caramel
- 1 C butter, melted
- 1 C heavy whipping cream, at least 36% milkfat
- 1/3 C water
- 1/2 C light corn syrup
- 2 C granulated sugar
- 1 tsp kosher salt
- 1 tsp vanilla extract
For Decorating
- 1 lb high quality melting chocolate (milk or dark)
- 1/2 lb high quality melting chocolate (white)
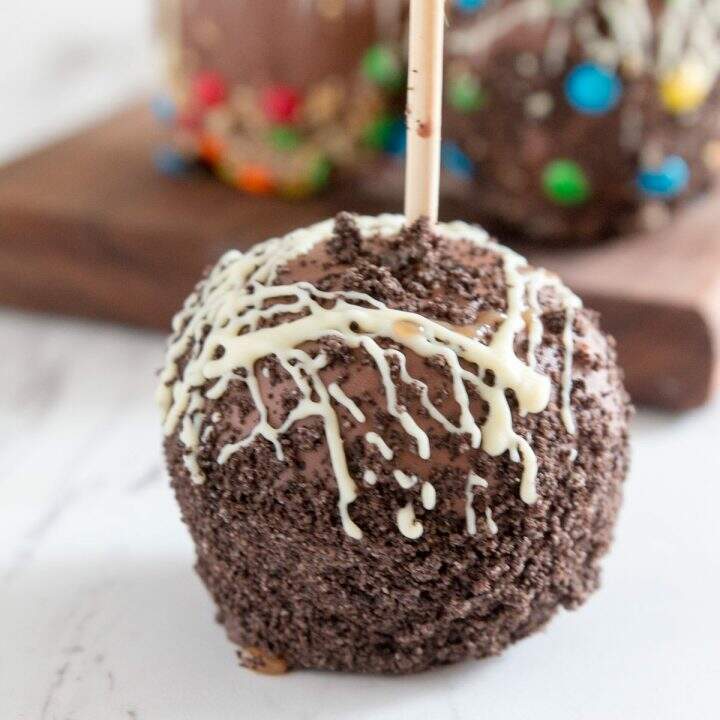
- crushed cookies, graham crackers, candies, nuts, sprinkles, etc...
Instructions
Prepare Apples
- If your apples were purchased at a grocery store you will need to scrub them well with warm water and a clean scotch pad to remove the waxy film put on them. After washing, dry apples well with a paper towel.
- Remove stems. Push popsicle sticks in where the stem was.
- Cover a half sheet pan with parchment paper. Put prepared apples on pan and refrigerate until ready to use.
Make the Caramel
- Mix the melted butter and the whipping cream and set aside to be added later.
- In a medium saucepan combine sugar, water, and corn syrup. Heat over medium heat until it comes to a boil. I like to keep a bowl of water and a pastry brush next to the sauce pan to wash away any crystals that form on the sides and stop the candy from crystalizing.
- Attach a candy thermometer and cook until the sugar reaches a temperature of 320 degrees F.
- Quickly whisk in the cream and butter mixture.
- Continue cooking over medium heat until the caramel reaches a temperature of 245 degrees F. Remove from heat and stir in salt and vanilla.
- Pour finished caramel into a tall container (I find a quart measuring cup works well) for dipping
Dipping apples
- Make sure apples are completely dry and remove any condensation that may have formed from the refrigerator.
- Dip the apple into the caramel and spin until completely coated. Pull apple up out of the caramel and spin to let excess caramel drip off. Place on parchment papered sheet pan. Don't worry if some of the caramel drips off and forms a puddle, we'll remedy that later. When all of the apples are finished set aside until caramel has set completely.
Decorating the apples
- Begin by cutting the puddle of the caramel apples with kitchen scissors (and eat the scraps ;))

- Melt chocolate and white chocolate on the stove over very low heat, or in the microwave at 50% power, stirring every 30 seconds. Move the milk/dark chocolate to a tall, thin container (like a measuring cup). Put the white chocolate into a small ziploc bag
- Dip the apples into the milk/dark chocolate the same way you did the caramel. Then sprinkle/place any desired toppings on top. I found it works much better to hold the apple and sprinkle toppings on than it does to dip the chocolately apple into the toppings (see pic)

- snip the very corner of the ziploc bag holding the white chocolate and drizzle it over the top of the completed apples. Refrigerate until chocolate has set.
- Cutting caramel apples before eating makes for a much more pleasant experience. You can also add a cute gift tag and share the goodness!

Notes
Calories calculated using MyFitnessPal
Caramel Recipe adapted from Inspired Taste
Nutrition Information:
Yield: 12 Serving Size: gAmount Per Serving: Calories: 443


I could not love this post anymore. Cutting off the caramel is GENIUS! I love that you have included gift tags. This year for my caramel apple making, I am doing it with family (because of the 12 apples in the fridge problem!) I also gave in and bought a candy thermometer last year and it is SO worth it. Seriously this is one of THE best blog posts I have ever read.
What a sweet comment, thanks Abbey! I hope you have success and that you and your family are doing well 🙂
Ok these apples are beyond cute! And I love the gift tag idea!!!!
Thanks Marlee, I had fun with the post!
How adorable! I love those gift tags too. I think the one with the crushed cookies is my favorite.
Loved this post so much! We do a halloween party every year and the highlight is a caramel apple making station where I have caramel and lots of toppings ready to go! I totally want to print off these tags to go with them now! Thanks for all the awesome pointers!
So fun, we often do caramel apple dipping parties as well!